Category: Software

New Hackintosh: HP EliteBook Folio 9470m

By , 2017-04-01 00:23

Update 2: Here are 2 EFI folders from the comments. I haven’t tested these, all credits to the commenters. Thanks!

CP-EFI_10_12_4_9470m (    2017-04-30 at 18:36)

EFI_High-Sierra_Osman-Afifi (    2017-10-07 at 15:43)

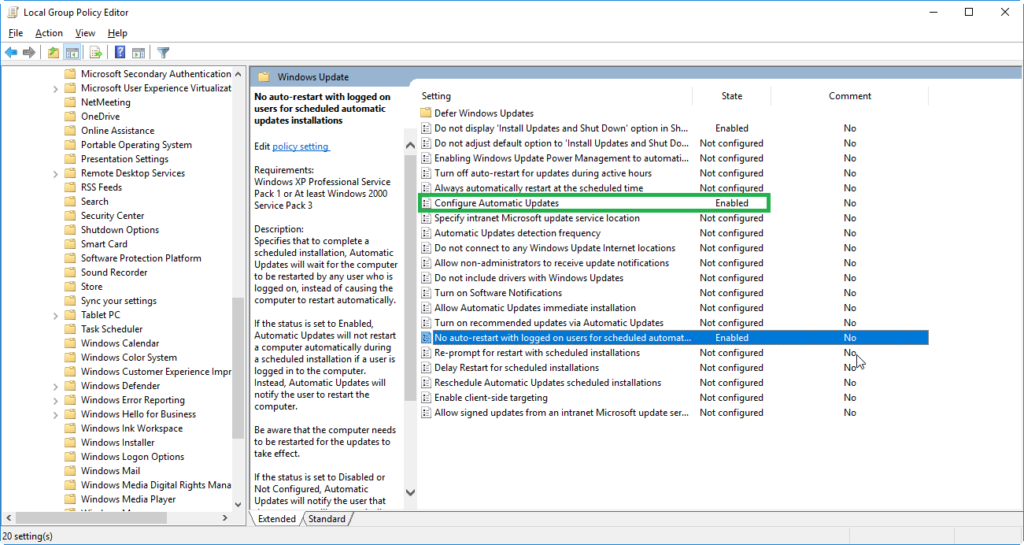
Update: The macOS Sierra 10.12.4 update breaks backlight brightness control. See below for fixes.

Just in time for April Fools’ day, got a new hackintosh working. And this one even looks like a MacBook Pro!

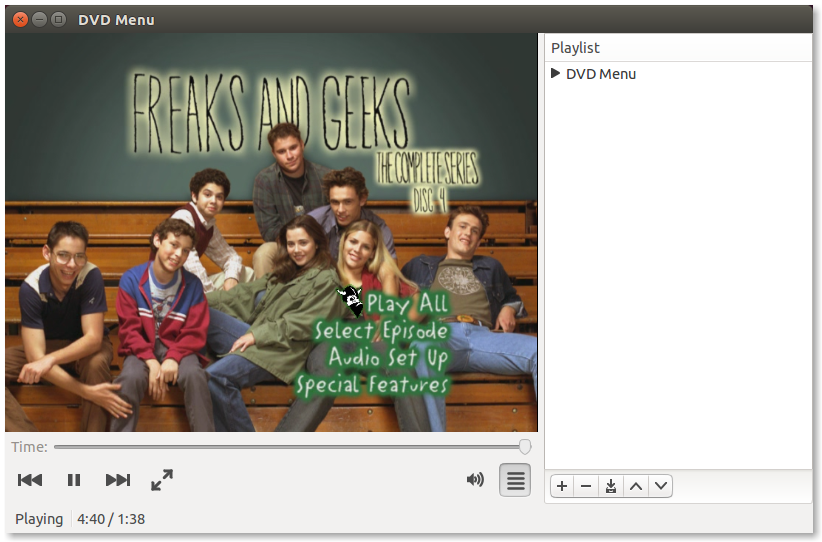
I present to you, the EliteBook “Pro” (9470m).

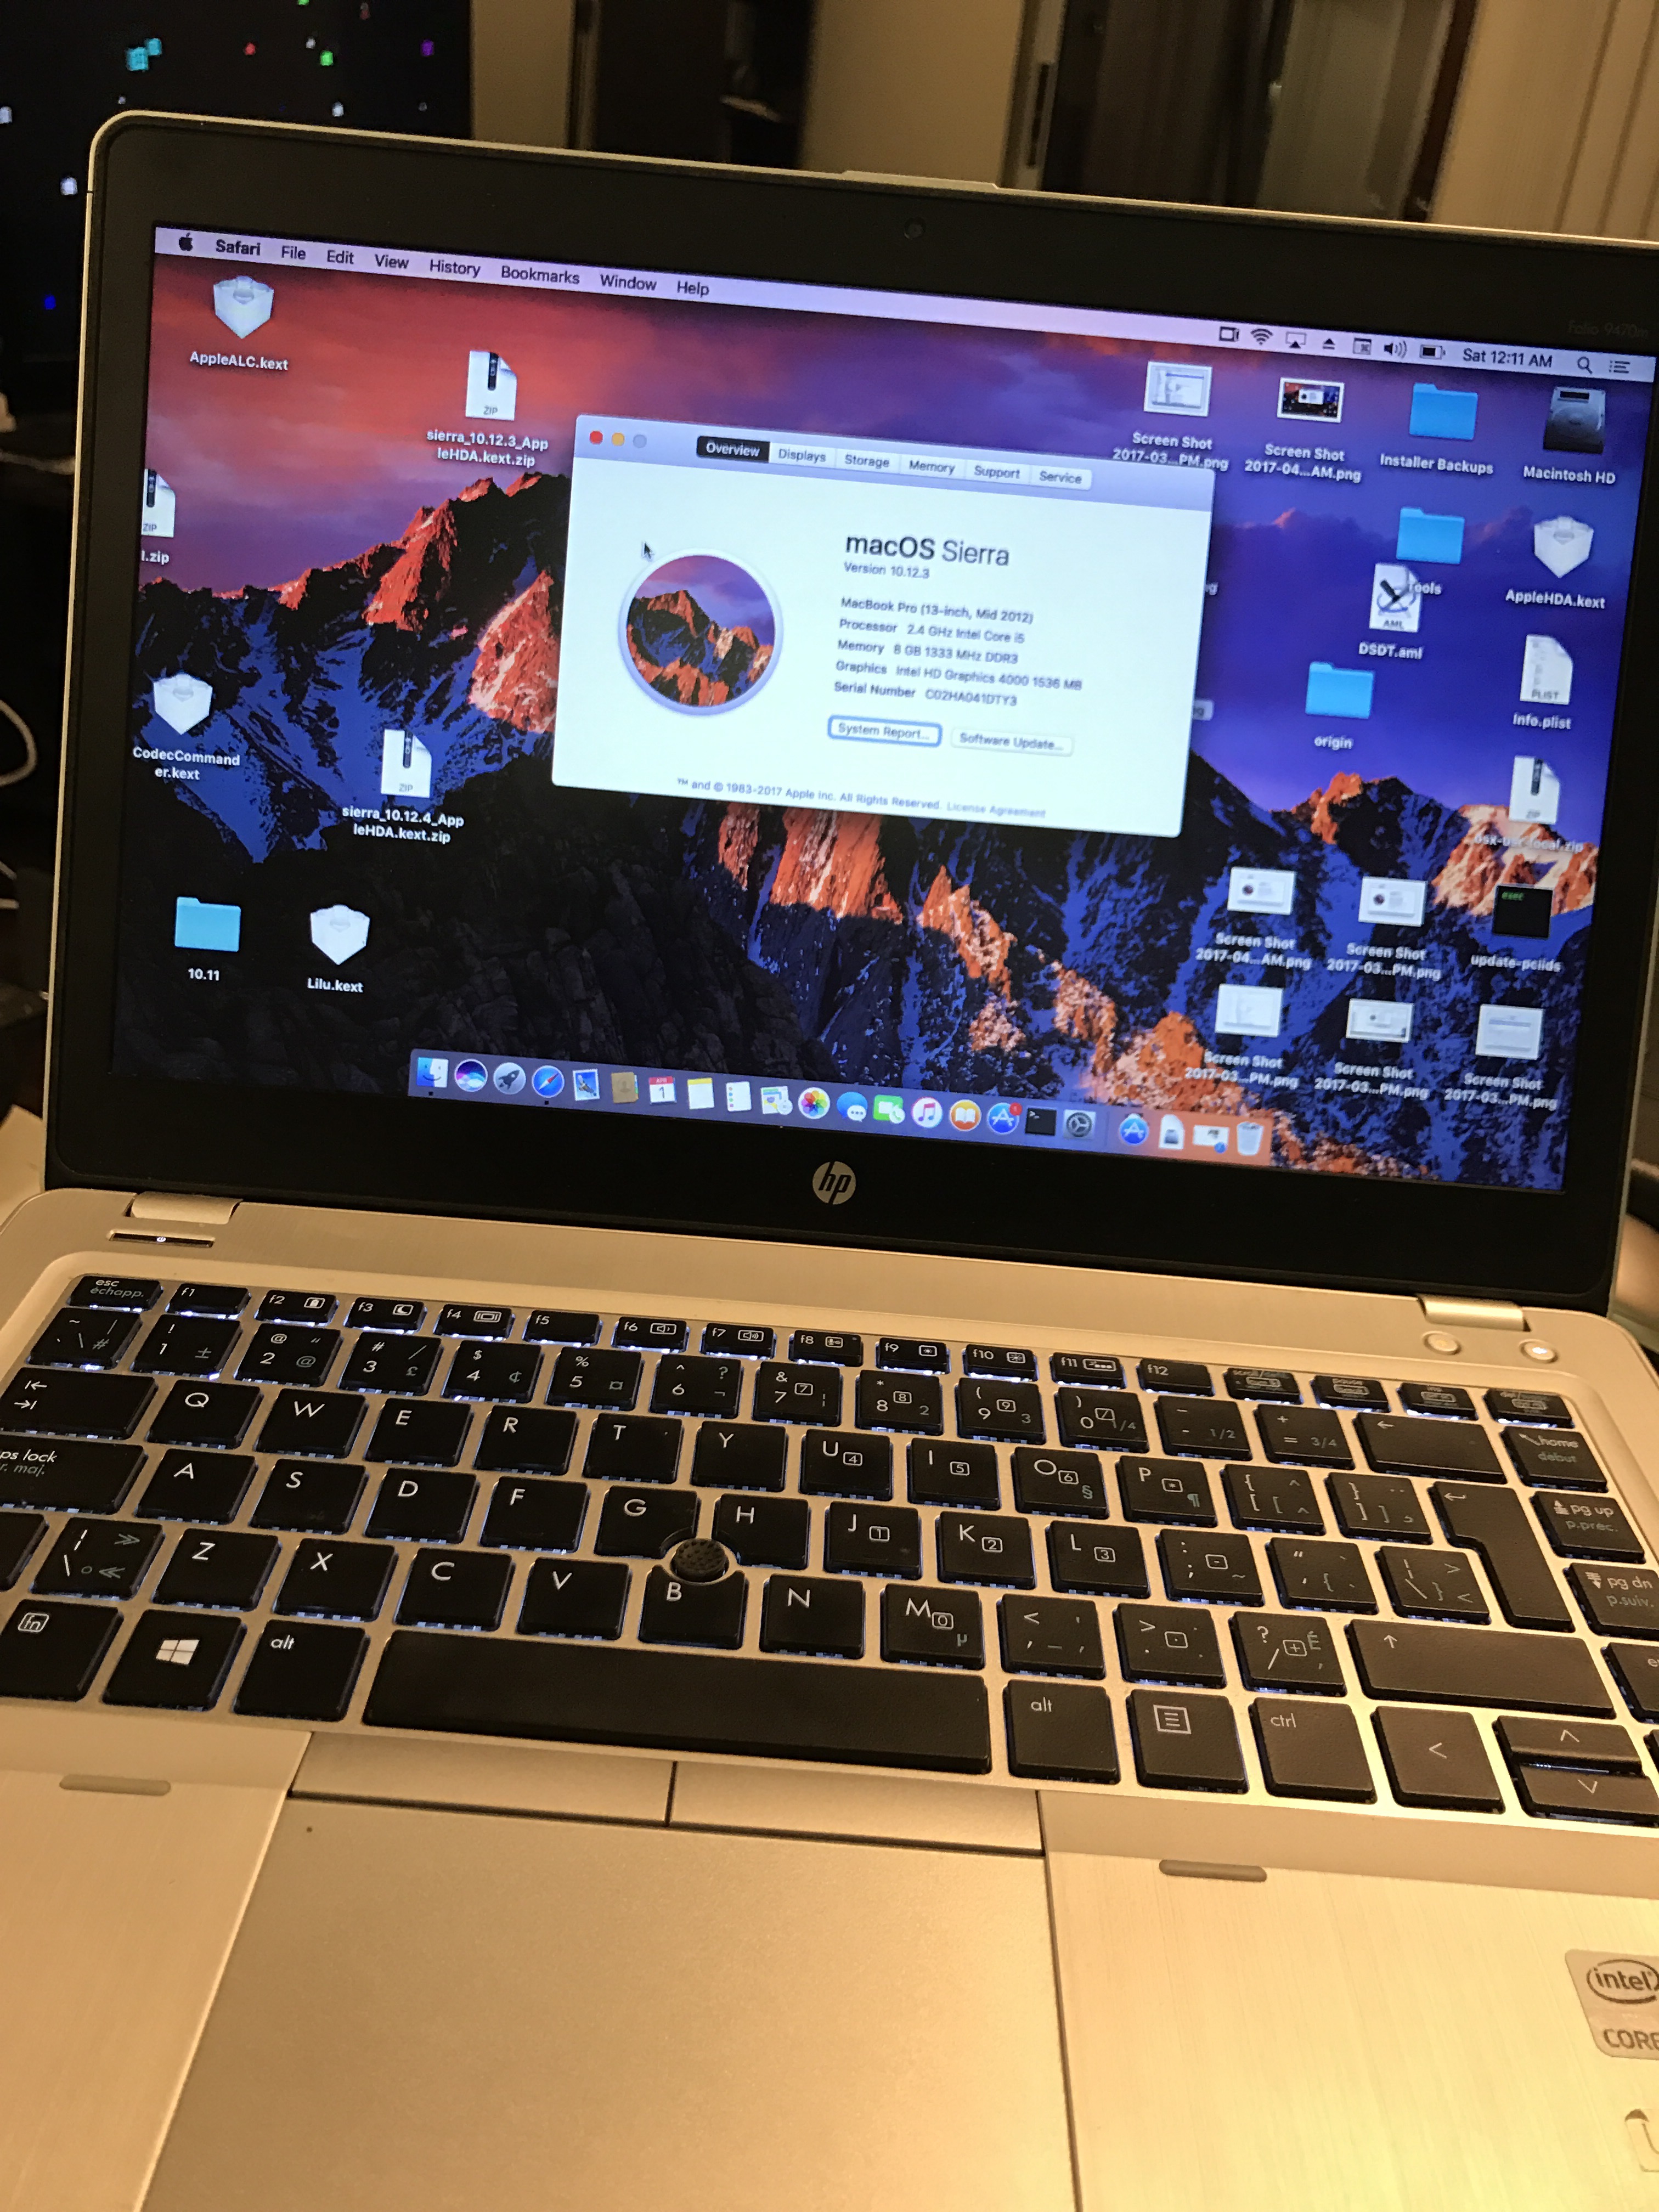
EliteBook “Pro” 9470m. Please excuse the messy desktop icons.

The EliteBook 9470m was, if I recall correctly, HP’s second Ultrabook, and their first true “Enterprise” Ultrabook – that is, one with docking capability and easy field repairability . You can find a full review over at NotebookCheck.net.  It was pretty popular with businesses who wanted to give their employees a more affordable and more IT-friendly “MacBook-like” device. Also, it was released back in late 2012, which is just over 4 years ago as of this writing. (Crazy! Time flies.) This means that they can be had relatively cheap in the off-lease market today, as the typical computer lease is between 3-5 years. My local computer store is selling them for under $400, which is a pretty good value in my opinion.

These days, installing macOS is relatively easy compared to 10-12 years ago when I first started messing with Hackintosh/OSx86, so I’ll just post my Clover “EFI” folder which should get you booted into macOS Sierra on the 1366×768 version of the 9470m. I did also swap out the Intel WiFi card for a Dell DW 1510 which works out-of-the-box.

Download my Clover EFI folder (zip 19MB): EFI 3  See below for 10.12.4 brightness fix

Working:

  • Internal graphics with full acceleration, brightness control using scroll lock/pause-break keys
  • Sound via VoodooHDA (built-in mic, speakers as well as TRRS headset jack. Volume and Mute fix in Info.plist necessary)
  • Touchpad with 2-finger scroll
  • Internal PS/2 keyboard
  • 3 USB 3.0 ports
  • Wired gigabit Ethernet
  • WiFi (replacement DW 1510 Broadcom card)
  • Built-in webcam

Not working:

  • Sleep (wakes up instantly)
  • Original Intel 6235 WiFi + Bluetooth
  • TrackPoint/Nub/Nipple mouse
  • Validity Fingerprint reader
  • WiFi on/off button

Not tested (yet):

  • Docking
  • VGA-out
  • DisplayPort-out
  • HDMI Audio
  • SD Card Reader

I will updated the lists as I test more things.

Main reference for this was RehabMan’s Elitebook guide.

10.12.4 Backlight Brightness control fix

Download updated EFI folder (zip 19MB): EFI 10.12.4

Fixes included:

  • Removed NullCPUPowerManagement.kext
  • Updated VoodooHDA.kext/Contents/Info.plist to include Mute Fix
  • Added SSDT-PNLF.aml in ACPI/patched as per guide
  • Edited config.plist to load SSDT-PNLF.aml
  • Fixed backlight control (using this guide)
    • Re-patched DSDT in MacIASL with the following fixes only from “RehabMan-Laptop”:
      • battery_HP-ProBook-4x0s-G1.txt
      • graphics_Rename-GFX0.txt
      • graphics_HD4K_low.txt
    • Added AppleBacklightInjector.kext

Extra .kexts for SD card reader: JMicron.zip


osx-usr-local


Taking back control of updates in Windows 10

By , 2017-01-15 18:35

Microsoft’s latest OS brings a lot of improvements and changes to Windows. One particularly significant change is the way Windows Update works. By default, Windows Update will decide on its own when it wants to restart your computer – be it in the middle of rendering video, uploading or downloading a large file, or even in the middle of a competitive gaming session:

There are a few steps you can take however to make living with Windows 10 more bearable and stop it from interrupting activities on your computer.

Unfortunately, these steps only work on Windows 10 Pro, Enterprise and Education editions.

Part 1: Local Group Policy

  1. Run the Local Group Policy Editor tool by typing “gpedit.msc” into the Run dialog box.
  2. Navigate to Computer Configuration > Administrative Templates > Windows Components > Windows Update
  3. The policies we are interested in are Configure Automatic Updates and No auto-restart with logged on users for scheduled automatic updates installations.
  4. Set both policies to Enabled, then for Configure Automatic Updates, configure the options as shown:
    2 – Notify for download and notify for install
  5. This should take care of preventing your computer from restarting automatically when it feels like it.

Part 2: Disabling Updates are available nag screen

OK, so now you’ve got the automatic updates disabled. But you’ve been a bit lax with your updates and haven’t manually installed them in a while. So Windows 10 presents you with this:

Which is good, because you really should keep your computer up-to-date for both your own and others’ security online.

However, there are some cases where this screen can be incredibly annoying – on a digital signage box, on an HTPC, or on a gaming computer for example – since it interrupts whatever you are doing with an un-closeable prompt, much like adware.

The good news is that there is a way to disable it. It’s a bit less “official”, so it may not work for you, but so far so good for me.

From an elevated Command Prompt, run the following commands.

cd /d "%Windir%\System32"
takeown /F MusNotification.exe
icacls MusNotification.exe /deny Everyone:(X)
takeown /F MusNotificationUx.exe
icacls MusNotificationUx.exe /deny Everyone:(X)

Warning: I don’t advocate running commands without knowing what they do or trusting the source, and since you might not trust me, I’ll explain what the commands do.

First we Change Directory (cd) to the Windows system32 folder. Then, we take ownership of the file MusNotification.exe and deny Everyone (including the system itself) from eXecuting it. Then we repeat the process for MusNotificationUx.exe.

And that’s it!

Discs that can be used to configure AccurateRip on a new drive

By , 2016-12-17 16:11

Was just setting up EAC to use a new external Blu-Ray drive, and had some difficulty finding eligible key discs – discs that have only one pressing and are known to the AccurateRip database.

EAC needs 3 discs to correctly confirm the drive’s offset.

The discs I used were:

  • Hey Rosetta! – Seeds | Sonic Records 2 000018
  • Hey Ocean! – IS | Nettwerk 0 6700 30972 2 2
  • Taylor Swift – 1989 D.L.X (Deluxe) | Big Machine Records/Universal Music Canada BMRB0550E

Saving here for future reference to avoid me having to go through a pile of CDs next time I need to calibrate EAC for a new drive.

My convoluted Subsonic server setup

By , 2016-05-15 21:23

Since ending my colo server plan, my Subsonic server hasn’t been running. I used to just have all my media synced to the Proxmox server I had in colo, then bind-mounted that folder to the OpenVZ container that was running Subsonic.

I’ve now moved my Proxmox/Subsonic server to a little Zotac ZBOX on my LAN that only has one local disk so I figured I wouldn’t sync all my music over locally when it could just directly access it from my new FreeNAS box. Turns out this is a little bit more complex than I thought – here are the steps I did to get it working:

  1. Get all music onto the FreeNAS box. For this I’m still using BTsync. One client is on my Mac, sharing my iTunes library, the other is in a FreeNAS jail.
  2. Install Subsonic in an LXC container on the Proxmox server.
  3. Create an NFS export on the FreeNAS server and mount it as storage on Proxmox. I just used the “Add storage” option in the Proxmox Web UI rather than adding it to fstab, because I was lazy.
  4. Configure the LXC bind mount. Essentially, in /etc/pve/104.conf :
     mp1: /mnt/pve/freenas,mp=/mnt/freenas
  5. Set up Subsonic to scan the /mnt/freenas/music folder.
  6. Realize that Subsonic has issues with non-ASCII characters in filenames. Fix it by adding “export LANG=en_CA.UTF-8” to the subsonic.sh start script.
  7. Realize that Subsonic has no access to write to the NFS share, since the GIDs on the FreeNAS box and the Subsonic container don’t match. I use GID 500 = users as my main group on FreeNAS, so I created a group freenasusers with GID 500 in the Subsonic container and added the subsonic user to this group.

Probably missed some steps, but that’s the gist of it. I really need to get my blogging and documentation back on track.

Enabling DVD playback on Ubuntu 14.04

By , 2014-08-02 21:37

I don’t really play DVDs on my PCs much anymore, but my brother have me the full boxed set of Freaks and Geeks (great show, cancelled too soon). Running on a fresh install of Ubuntu 14.04, I popped in the DVD and was prompted by “Video Player” aka Totem to install some additional codecs. I obliged, but after the installation, the DVD still wouldn’t play. It turns out that because of legal issues, the libdvdcss2 library is no longer included in the Ubuntu repositories. However, the libdvdread4 package does provide a script to easily install it.

Once you have libdvdread4 installed, run following script:

# sudo /usr/share/doc/libdvdread4/install-css.sh

Restart your video player and enjoy your DVD.

Screenshot from 2014-08-03 01:35:17

uptime

By , 2014-07-31 15:32

I noticed that my workstation has been up essentially since I made my last blog post.
129 days and counting.

 $ uptime
 15:22:40 up 129 days,  2:41,  5 users,  load average: 1.88, 1.91, 1.93

This system also hasn’t been re-installed since November 2012. The initial install was done using the Ubuntu 12.10 “Quantal Quetzal” CD on November 20, 2012. I’ve since upgraded to every interim release – 13.04, 13.10 and now 14.04, and used a host of different desktop environments and window managers (currently using i3). The PC actually hasn’t been rebooted since installing 14.04; I only restarted X.

matt@work:/var/log/installer$ ls -l
total 1532
-rw------- 1 root   root   1303 Nov 20  2012 casper.log
-rw------- 1 root   root   3856 Nov 20  2012 debug
-rw-r--r-- 1 root   root 420116 Nov 20  2012 initial-status.gz
-rw-r--r-- 1 root   root     59 Nov 20  2012 media-info
-rw------- 1 root   root 747016 Nov 20  2012 partman
-rw------- 1 syslog adm  377562 Nov 20  2012 syslog
-rw------- 1 root   root     17 Nov 20  2012 version
matt@work:/var/log/installer$ sudo cat media-info 
Ubuntu 12.10 "Quantal Quetzal" - Release amd64 (20121017.5)
matt@work:/var/log/installer$


Selection_111

two-line bash script to extract all rars in a given folder

By , 2013-02-15 12:15

This script will find all .rar files in a given directory and extract them into the specified directory. Requires the unrar binary installed in PATH.

usage: unrar-recursive.sh [directory to scan] [extraction destination dir]

  • Running the script without arguments will search for all .rar files in the current directory and subdirectories and extract them all to the current working directory.
  • Running the script with only 1 argument will search for all .rar files in the specified directory and extract them into the same directory.
#!/bin/bash
if [ "$#" -eq 0 ]; then dest=$1; else dest=$2; fi
find $1 -type f -iname "*.rar" -exec unrar e {} $dest \;

Sources:

Google Car Home for rooted Android devices

By , 2012-11-21 13:22

image

For some reason, Android versions greater than 2.3 no longer come with the Google CarHome app. This is an app that gives your phone a simplified interface for easier use in-car.

To install on a rooted device, download CarHomeGoogle.apk

Copy it to /system/app, set permissions to -rw-r–r– (644) and user/group owner to root.

Atheros AR5005/5212, WPA encryption

By , 2012-11-07 22:08

I have a few old reliable AR5005G (5212, PCI 168c:0013) cards, both MiniPCI and Cardbus from the heyday of Wireless-G back in the early ’00s. Back then, Atheros 500x series cards were THE cards to have if you wanted to have some fun with aircrack, or if you just wanted your WiFi to actually WORK, especially under Linux. The madwifi (aka ath_pci) drivers were probably the most stable wireless drivers at the time. Even on Windows, you could use 3rd party drivers to put the cards in monitor mode and capture packets.

Times have changed and madwifi has been superseded by ath5k (and indirectly ath9k).

For some reason I decided to install Ubuntu 12.04 on an old Fujitsu Lifebook (Pentium III 600MHz, upgraded 512MB RAM, ATI Mobility Radeon M4) without built-in wireless, using a Netgear WPN511 Cardbus adapter. I expected everything to work as it did in the old days, but for some reason the WiFi wouldn’t stay connected.

It seems the hardware encryption capabilites on the card don’t quite support WPA2/CCMP-AES, even though the ath5k driver says it does. So the solution is to disable hardware encryption support:

echo "options ath5k nohwcrypt=1" | sudo tee /etc/modprobe.d/ath5k.conf

Then reboot, or reload the ath5k module (modprobe -rv ath5k, modprobe -v ath5k).

Now I can enjoy my surprisingly not-extremely-slow 10-year old laptop wirelessly.

Source: http://ubuntuforums.org/showthread.php?p=12086356#post12086356

http://madwifi-project.org/

Useful apt commands

By , 2012-10-29 14:46

apt-cache search [searchterm]

search local apt-cache for a package  containing [searchterm]

apt-file list [packagename]

lists all files associated with [packagename], even if the package is not installed

apt-file search [/path/to/file]

search for the package that “owns” [/path/to/file]

apt-cache madison [packagename]

displays all available versions of [packagename]

apt-get install [packagename]=[version]

force apt to install a specific version of a package

Custom theme by me. Based on Panorama by Themocracy