Bought a cheap USB multi card reader the other day. Tried it on my Ubuntu netbook and it worked great. However, today I tried to use it on my Windows 7 PC and it wasn’t detected. Opening the device manager revealed that no card reader had been detected, however a new “eHome Infrared Receiver (USBCIR)” was detected with an error.
The solution is to right-click the device, choose Update Driver, and force the “USB Composite device” driver.
Recorded yesterday from my PowerBook G4.
$ rsync -WavP src.file dst.file
Hello,
This is a message for the commenter “WC from Bristow” who posted a review of Mac OS X Snow Leopard on the Apple Store website on Decemer 11, 2010 (review posted below for SEO/reference).
I just wanted to let you know that your MacBook Pro is DEFECTIVE. I hope that by some strange chance you might read this before your warranty expires. There is a known issue with the GeForce 9400M graphics chips in the original unibody MacBooks with removable battery. There is random screen flickering. This is a hardware issue, and no matter what you do will not go away. If your laptop is still under warranty, and even if it’s not, take it back to Apple and demand a replacement. They will probably swap it for a new, current-generation MacBook.
Just a friendly suggestion from someone who went through the same frustration.
Not Impressed
- Written by WC from Bristow
- 11-Dec-2010
Snow Leopard brought some serious problems. Mail will chew up 50 to 75% of the processor just idling. Flashing video/screen on MacBook Pro 15″ when on low power video card setting causes me to run all the time in high performance mode so it does not flash… and now my battery lasts for an hour and a half if I am lucky. (in part because of the processor overloading of Mail). This adds 2 lbs+ to the laptop because I must now carry two extra batteries (and I do).
I spend a lot of time in Mail… and bugs like copying the email address and getting a bunch of extra garbage that needs to be trimmed after pasting is aggravating. Dock lockups, Browser lockups. Spinning beach ball of death with much greater frequency than normal Leopard. At points cascading chronic app crashing which is “cured” by rebooting the machine (a la Windows)
Hope that Lion brings some relief. Snow Leopard has fleas.
After nearly a year of being slightly annoyed at my Nexus One’s stock keyboard having only an AZERTY French keyboard as opposed to a QWERTY one we use in Canada, I finally took matters into my own hands and modded the recently “leaked” Gingerbread keyboard to make the French keyboard QWERTY. Download below.
Après près d’un an avec mon Nexus One et son clavier soit anglais, soit AZERTY, j’en ai eu assez et ai décidé de modifier le clavier Android pour permettre l’entrée du texte français via un clavier QWERTY. Téléchargement disponible ci-dessous.
gingerbreadkb-multilang-update-signed-fr_CA-qwerty.zip-signed.zip
References/This would not have been possible without:
- Original idea: http://code.google.com/p/android/issues/detail?id=8494#c18
- How to create a signed apk: http://www.androiddevelopment.org/tag/jarsigner/
- How to create a signed update.zip: http://www.robmcghee.com/android/creating-an-android-update-zip-package/
- Original Gingerbread keyboard with French dictionary: http://forum.xda-developers.com/showpost.php?p=9794752&postcount=109
By default, deluged on Arch creates files as -rw-r–r–. I want -rw-rw-r– so that other non-daemon regular users have access to modify and delete the downloaded files. The fix is to add the non-deluge users to the “deluge” group (125), then add umask 002 to the “login” process of the daemon. So, in /etc/rc.d/deluged:
stat_busy "Starting Deluge Daemon"
[[ -z $PID ]] && su -l -s /bin/sh -c "umask 002 && /usr/bin/deluged >/dev/null" $DELUGE_USER
I have a strange situation where I want to redirect a specific port on one host to another host. That is, traffic to 192.168.1.100:8080 => 192.168.1.101:8080.
Found the answer on LQ forums.
iptables -A PREROUTING -t nat -p tcp -d 192.168.1.100 --dport 8080 -j DNAT --to-destination 192.168.1.101
iptables -A POSTROUTING -t nat -p tcp -d 192.168.1.101 --dport 8080 -j SNAT --to-source 192.168.1.100 |
iptables -A PREROUTING -t nat -p tcp -d 192.168.1.100 --dport 8080 -j DNAT --to-destination 192.168.1.101
iptables -A POSTROUTING -t nat -p tcp -d 192.168.1.101 --dport 8080 -j SNAT --to-source 192.168.1.100
Don’t ask me why this works. It just does. Well, the first line makes sense, but I have no idea what the second is doing.
After looking at the rule in Webmin, I think I figured it out.
- When a packet arrives at this computer, if protocol is TCP and destination is 192.168.1.100/32 (local IP) and destination port is 8080 then Destination NAT (change destination IP) to 192.168.1.101
- When a packet leaves this computer, if protocol is TCP and destination is 192.168.1.101/32 and destination port is 8080 (as would be the case for any packet modified by the above rule), then Source NAT (change source IP) to 192.168.1.100. (This ensures that the remote host .101 returns any packets via this computer, .100, rather than simply attempting to send them to the original requesting host.)
Update: This even works on an OpenVZ container! Just need to enable iptables nat in the vz config on the hardware node (VM host) [source].
nano /etc/vz/vz.conf
Then do Control W and SEARCH for IPTABLES
Comment out (by adding a # symbol to the line ) the current IPTABLES= line
and then copy/paste and add this line directly underneath the line you just commented out.
IPTABLES="ipt_REJECT ipt_recent ipt_owner ipt_REDIRECT ipt_tos ipt_TOS ipt_LOG ip_conntrack ipt_limit ipt_multiport iptable_filter iptable_mangle ipt_TCPMSS ipt_tcpmss ipt_ttl ipt_length ipt_state iptable_nat ip_nat_ftp"
It is important to make sure this is all in 1 line and that it does not wrap.
Now Control-S and save – overwriting the current file.
Finally do an /etc/init.d/vz restart
to restart openVZ.
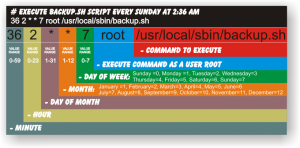
A handy, colourful guide to configuring cron, the *nix task scheduler.
Stolen from: http://www.notesbit.com/index.php/scripts-unix/crontab-quick-complete-reference-setting-up-cronjobs-in-unix-and-linux/
Setting up a PBXinaflash with a cheap Wildcard X100p card. A bit rough; for future reference.
Part 1: Initial setup and dahdi config
- Installed pbxinaflash (Bronze, Asterisk 1.6)
- set passwords using passwd-master script
- Enable ICMP ping in iptables.
- Run dahdi_genconf -v
- Run dahdi_cfg -v
- Add #include /etc/asterisk/dahdi-channels.conf
to /etc/asterisk/chan_dahdi.conf
- At this point, asterisk should answer calls from the PSTN and play a “not in service” message.
- Next step is probably to edit /etc/asterisk/dahdi-channels.conf and set context to from-zaptel to be able to assign a DID using the FreePBX web GUI.
Part 2: Adding SIP trunk
- PEER Details:
username=14165551212
type=peer
secret=s3cr3t
host=voip.voipprovider.net
dtmfmode=auto
- USER Details (not sure what’s necessary here, probably some of this shouldn’t be here)
username=14165551212
type=peer
secret=s3cr3t
qualify=no
promiscredir=yes
nat=yes
language=en
insecure=very
host=voip.voipprovider.net
fromuser=14165551212
fromdomain=voip.voipprovider.net
dtmfmode=auto
disallow=h263&h263p
context=from-trunk
canreinvite=no
- In System Admin> Asterisk SIP settings page, change useragent and activate NAT/external IP options
Part 3: Fax Config
- Installed Fax Configuration module from “Module Admin”. Configure destination email.
- Installed Free Fax for asterisk using license obtained from Digium
- Add a “Misc destination” for System Fax to extension 666
- Enable Fax detection on inbound route. Set destination to Misc destination created in step 2
- Further reading: fax_for_asterisk_admin_manual, http://bestof.nerdvittles.com/applications/fax/ and http://nerdvittles.com/?p=237. Didn’t end up using the extension created by the script, but perhaps the rpms installed are necessary.
- Finally, Web fax for Asterisk : http://www.csrdu.org/nauman/2010/10/18/web-fax-for-asterisk/
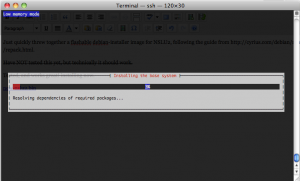
Just quickly threw together a flashable debian-installer image for NSLU2, following the guide from http://cyrius.com/debian/nslu2/repack.html.
Have NOT tested this yet, but technically it should work.
Tested, and works great! installing now. Hopefully it will be done by tomorrow morning.
During the install process, be sure to check off the “SSH Server” option! Otherwise you’ll have no way of accessing the slug.
new-nslu2.bin