Windows Default Soundfont
Arachna Soundfont
I post things here.
Windows Default Soundfont
Arachna Soundfont
Update 2: Here are 2 EFI folders from the comments. I haven’t tested these, all credits to the commenters. Thanks!
CP-EFI_10_12_4_9470m ( 2017-04-30 at 18:36)
EFI_High-Sierra_Osman-Afifi ( 2017-10-07 at 15:43)
Update: The macOS Sierra 10.12.4 update breaks backlight brightness control. See below for fixes.
Just in time for April Fools’ day, got a new hackintosh working. And this one even looks like a MacBook Pro!
I present to you, the EliteBook “Pro” (9470m).
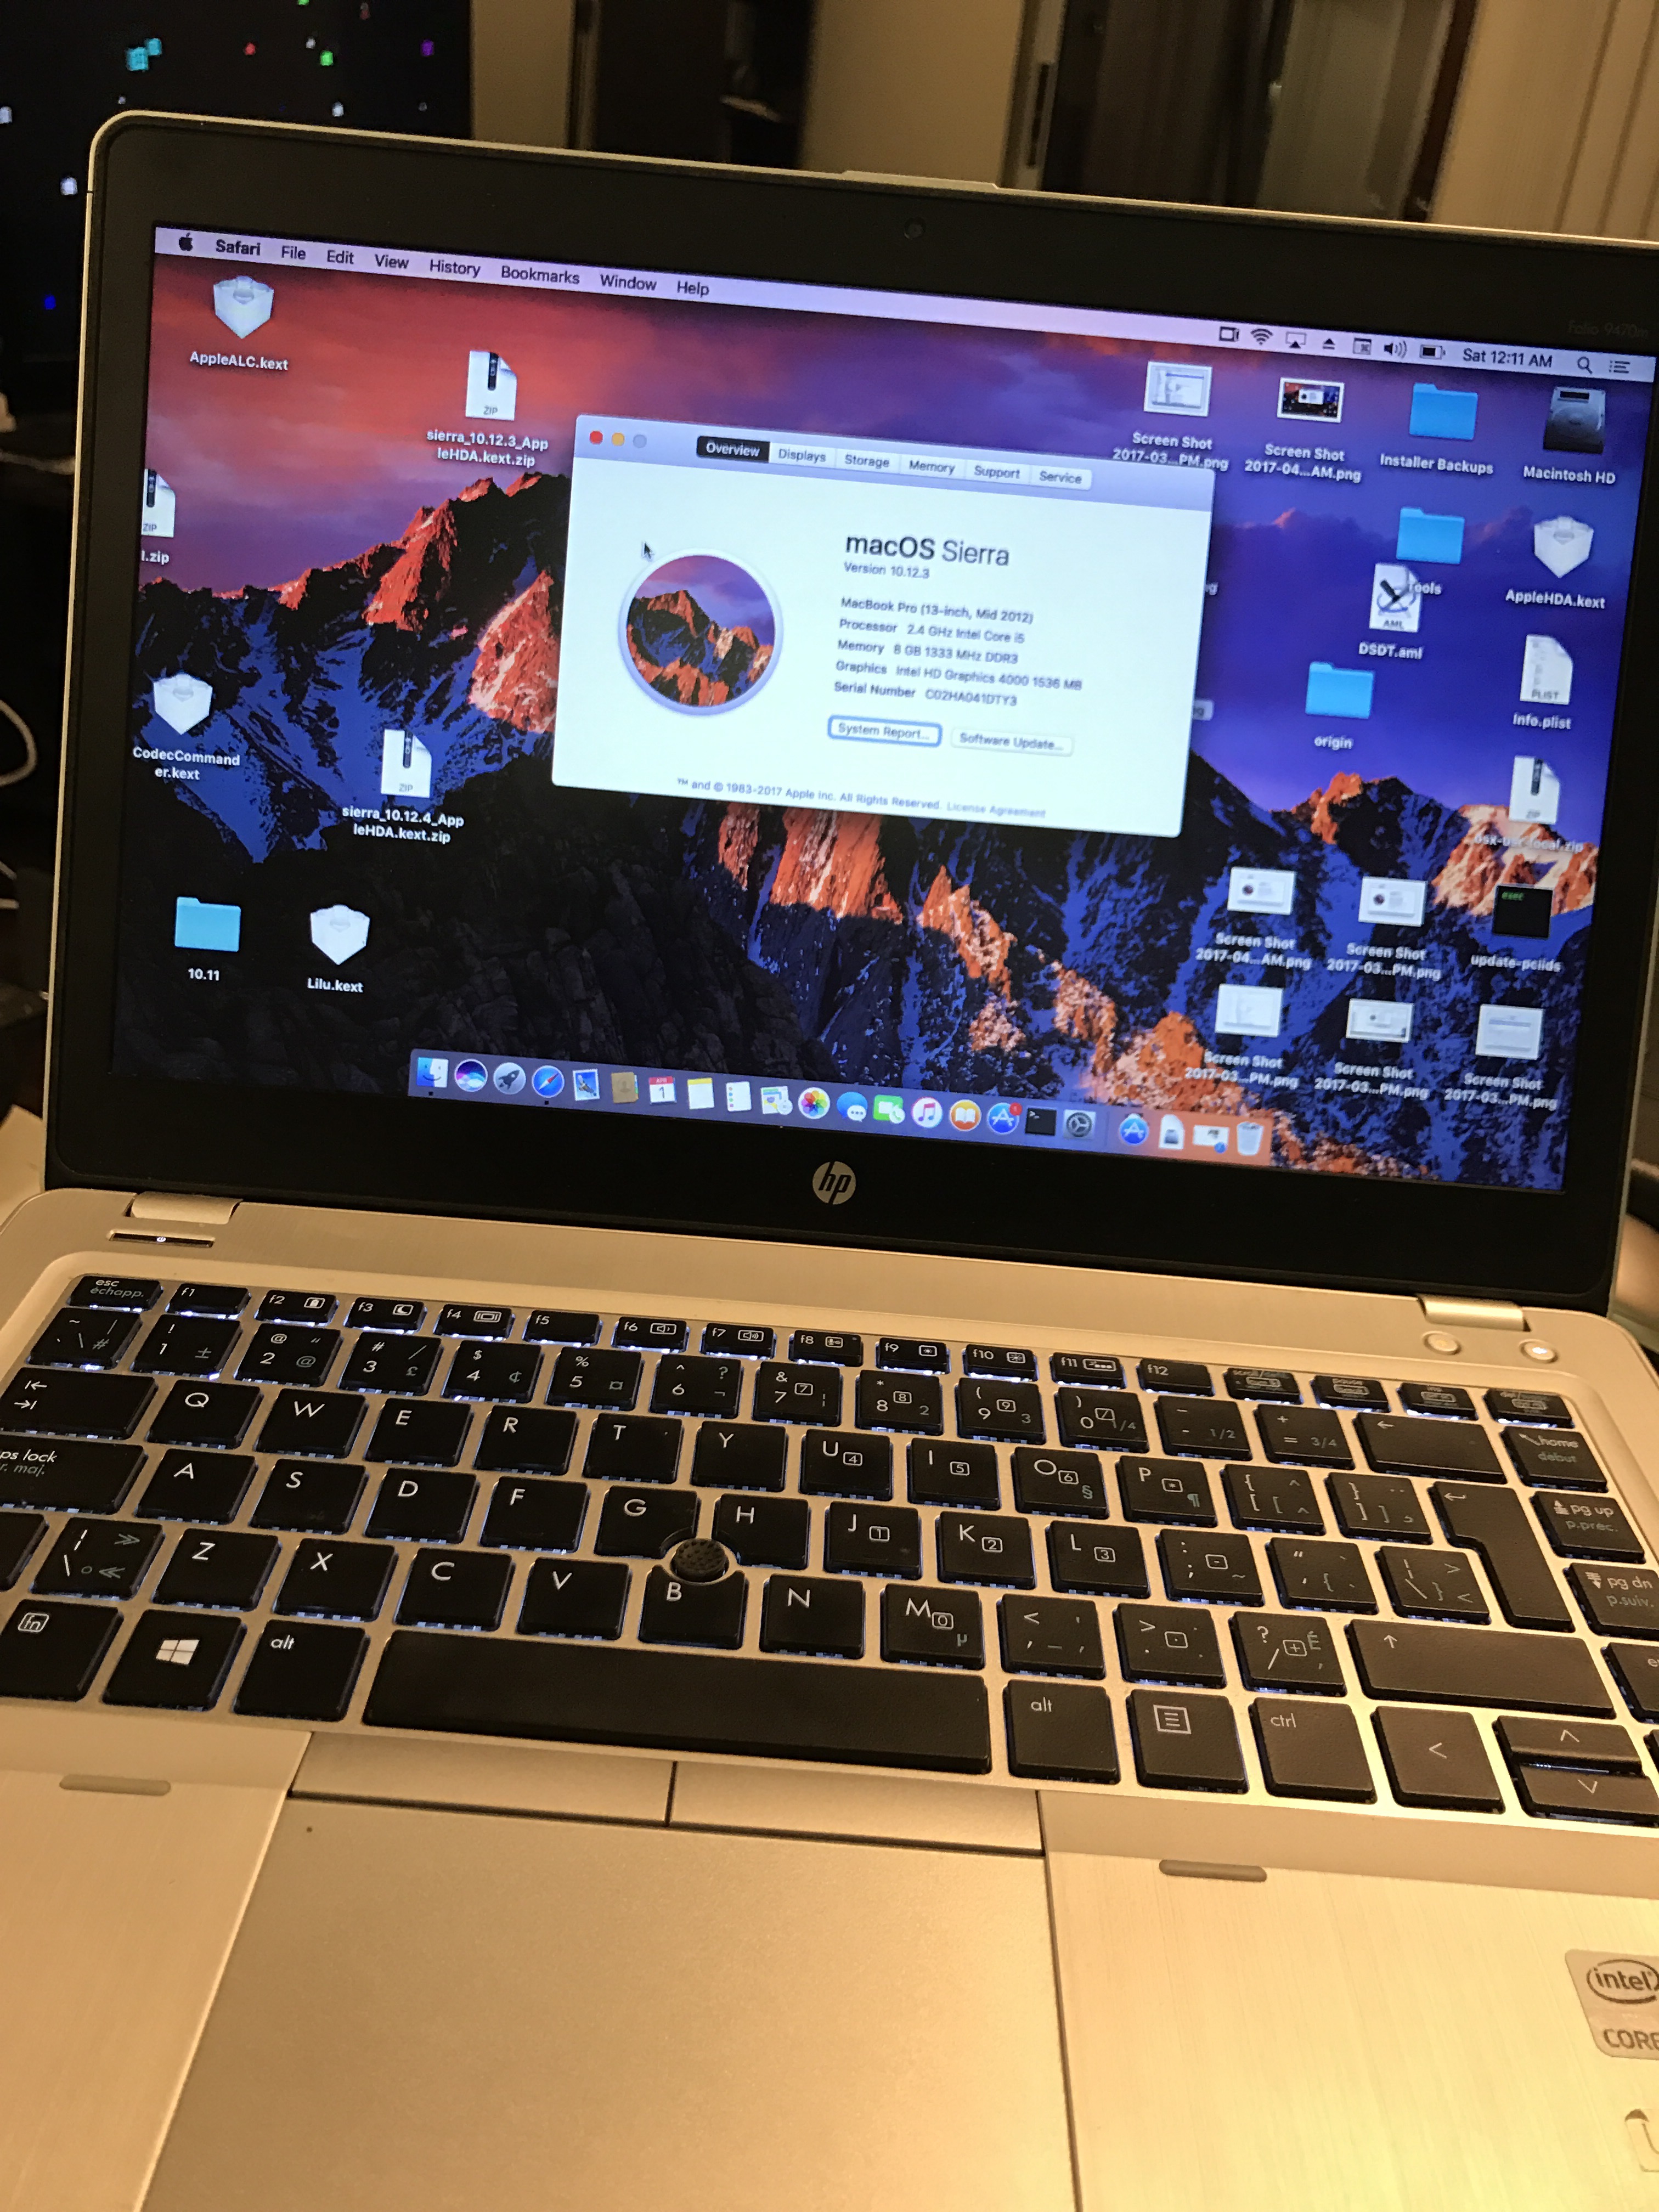
EliteBook “Pro” 9470m. Please excuse the messy desktop icons.
The EliteBook 9470m was, if I recall correctly, HP’s second Ultrabook, and their first true “Enterprise” Ultrabook – that is, one with docking capability and easy field repairability . You can find a full review over at NotebookCheck.net. It was pretty popular with businesses who wanted to give their employees a more affordable and more IT-friendly “MacBook-like” device. Also, it was released back in late 2012, which is just over 4 years ago as of this writing. (Crazy! Time flies.) This means that they can be had relatively cheap in the off-lease market today, as the typical computer lease is between 3-5 years. My local computer store is selling them for under $400, which is a pretty good value in my opinion.
These days, installing macOS is relatively easy compared to 10-12 years ago when I first started messing with Hackintosh/OSx86, so I’ll just post my Clover “EFI” folder which should get you booted into macOS Sierra on the 1366×768 version of the 9470m. I did also swap out the Intel WiFi card for a Dell DW 1510 which works out-of-the-box.
Download my Clover EFI folder (zip 19MB): EFI 3 See below for 10.12.4 brightness fix
Working:
Not working:
Not tested (yet):
I will updated the lists as I test more things.
Main reference for this was RehabMan’s Elitebook guide.
Download updated EFI folder (zip 19MB): EFI 10.12.4
Fixes included:
Extra .kexts for SD card reader: JMicron.zip
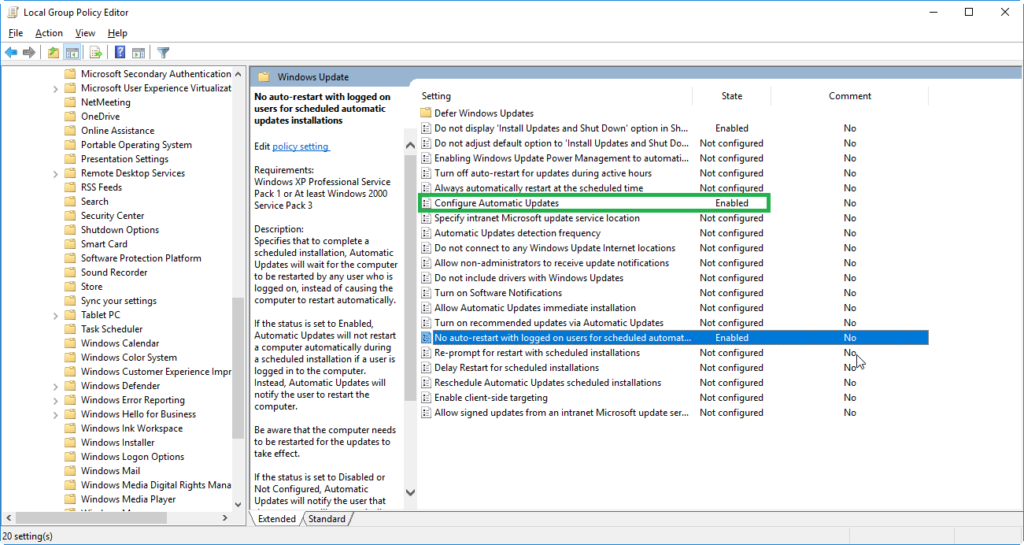
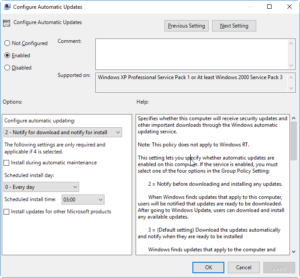
Microsoft’s latest OS brings a lot of improvements and changes to Windows. One particularly significant change is the way Windows Update works. By default, Windows Update will decide on its own when it wants to restart your computer – be it in the middle of rendering video, uploading or downloading a large file, or even in the middle of a competitive gaming session:

There are a few steps you can take however to make living with Windows 10 more bearable and stop it from interrupting activities on your computer.
Unfortunately, these steps only work on Windows 10 Pro, Enterprise and Education editions.
OK, so now you’ve got the automatic updates disabled. But you’ve been a bit lax with your updates and haven’t manually installed them in a while. So Windows 10 presents you with this:

Which is good, because you really should keep your computer up-to-date for both your own and others’ security online.
However, there are some cases where this screen can be incredibly annoying – on a digital signage box, on an HTPC, or on a gaming computer for example – since it interrupts whatever you are doing with an un-closeable prompt, much like adware.
The good news is that there is a way to disable it. It’s a bit less “official”, so it may not work for you, but so far so good for me.
From an elevated Command Prompt, run the following commands.
cd /d "%Windir%\System32"
takeown /F MusNotification.exe
icacls MusNotification.exe /deny Everyone:(X)
takeown /F MusNotificationUx.exe
icacls MusNotificationUx.exe /deny Everyone:(X)
Warning: I don’t advocate running commands without knowing what they do or trusting the source, and since you might not trust me, I’ll explain what the commands do.
First we Change Directory (cd) to the Windows system32 folder. Then, we take ownership of the file MusNotification.exe and deny Everyone (including the system itself) from eXecuting it. Then we repeat the process for MusNotificationUx.exe.
And that’s it!
Was just setting up EAC to use a new external Blu-Ray drive, and had some difficulty finding eligible key discs – discs that have only one pressing and are known to the AccurateRip database.
EAC needs 3 discs to correctly confirm the drive’s offset.
The discs I used were:
Saving here for future reference to avoid me having to go through a pile of CDs next time I need to calibrate EAC for a new drive.
Since ending my colo server plan, my Subsonic server hasn’t been running. I used to just have all my media synced to the Proxmox server I had in colo, then bind-mounted that folder to the OpenVZ container that was running Subsonic.
I’ve now moved my Proxmox/Subsonic server to a little Zotac ZBOX on my LAN that only has one local disk so I figured I wouldn’t sync all my music over locally when it could just directly access it from my new FreeNAS box. Turns out this is a little bit more complex than I thought – here are the steps I did to get it working:
mp1: /mnt/pve/freenas,mp=/mnt/freenas
Probably missed some steps, but that’s the gist of it. I really need to get my blogging and documentation back on track.
When setting up Postfix on Ubuntu/Debian as “Internet Site with smarthost” to use an external smtp relay, automatic e-mails intended for “root” (such as cron job error reports) get sent out to the smarthost with a To: address of [email protected]. This can cause a problem as the smarthost doesn’t know where to deliver these messages to, since myhost.mydomain.com has no MX record.
The fix for this is (go figure) in the Postfix README:
Delivering some but not all accounts locally
A drawback of sending mail as “[email protected]” (instead of “[email protected]”) is that mail for “root” and other system accounts is also sent to the central mailhost. In order to deliver such accounts locally, you can set up virtual aliases as follows:
1 /etc/postfix/main.cf:
2     virtual_alias_maps = hash:/etc/postfix/virtual
3
4 /etc/postfix/virtual:
5     root     root@localhost
6     . . .
Translation:
- Line 5: As described in the virtual(5) manual page, the bare name “root” matches “root@site” when “site” is equal to $myorigin, when “site” is listed in $mydestination, or when it matches $inet_interfaces or $proxy_interfaces.
Execute the command “postmap /etc/postfix/virtual” after editing the file.
Oddly, just adding the line
root: root@localhost
to /etc/aliases doesn’t work. You really need to do the steps outlined in the manual.
It’s really cool what we can do with computers these days. I generally take technology for granted, but sometimes I am just in awe of what is possible.

With the ubiquity of the Internet
It’s all too easy to forget
How amazing it is, that with relative ease –
Just a few strokes of the keys
A sysadmin can ssh to a box running Unix
On the other side of the world, or just across town.
And with just a few clicks
Bounce that Windows box that’s gone down.
Image credit: https://www.flickr.com/photos/stars6/4381851322/

I feel ready for the OPS235 exam. There are a few areas I need to brush up on, but overall I feel I have a grasp of most of the course content.
Strengths
Weaknesses
Exam review topics
 Software installed
Apache is an open-source web server software maintained by the Apache Software Foundation and the open-source community. It can be extended using modules, and is well-documented and well-supported. It is usually the de-facto standard Web server on Linux, although lately new and customized Web servers such as nginx have been becoming more popular for dynamic, high-traffic sites.
PHP is a server-side scripting language mainly used for web development. By writing PHP rather than plain HTML, developers are able to create pages that are dynamically generated by the server on the fly depending on parameters provided. The Zend PHP interpreter is open-source software, and is available as a module for multiple Web servers on Linux, Windows, BSD and other OSes.
MySQL is an open source relational database management system (RDBMS). It is open-source software, released under the GPL and sponsored by Oracle Corporation. The software is available at no cost, although there are also some paid versions. It has widespread use in Web applications, such as WordPress and MediaWiki, and is also used by large sites such as Facebook and YouTube.
Together, CentOS (Linux), Apache, MySQL and PHP form an implementation of a LAMP stack. This stack provides a consistent, portable environment for Web developers.
WordPress is an open-source blogging platform and CMS. It is written in PHP, and uses a MySQL database for text content storage and metadata. It provides an easy-to-use user interface, and is highly extensible and customizable with a large number of user-creatable themes and plugins. WordPress powers some prominent sites such as Forbes.com, vogue.com and nationalpost.com.
REJECT all -- 0.0.0.0/0 0.0.0.0/0 reject-with icmp-host-prohibited
 Chain INPUT (policy ACCEPT)
 num  target     prot opt source               destination
 1    ACCEPT     all  --  0.0.0.0/0            0.0.0.0/0           state RELATED,ESTABLISHED
 2    ACCEPT     icmp --  0.0.0.0/0            0.0.0.0/0
 3    ACCEPT     all  --  0.0.0.0/0            0.0.0.0/0
 4    ACCEPT     tcp  --  0.0.0.0/0            0.0.0.0/0           state NEW tcp dpt:22
 5    REJECT     all  --  0.0.0.0/0            0.0.0.0/0           reject-with icmp-host-prohibited
Chain INPUT (policy ACCEPT)
num  target     prot opt source               destination
1    ACCEPT     all  --  0.0.0.0/0            0.0.0.0/0           state RELATED,ESTABLISHED
2    ACCEPT     icmp --  0.0.0.0/0            0.0.0.0/0
3    ACCEPT     all  --  0.0.0.0/0            0.0.0.0/0
4    ACCEPT     tcp  --  0.0.0.0/0            0.0.0.0/0           state NEW tcp dpt:22
5    ACCEPT     tcp  --  0.0.0.0/0            0.0.0.0/0           tcp dpt:80
6    REJECT     all  --  0.0.0.0/0            0.0.0.0/0           reject-with icmp-host-prohibited
mysql> GRANT ALL PRIVILEGES ON databasename.* TO "wordpressusername"@"hostname"
    -> IDENTIFIED BY "password";
to allow access to the database. However, since the MySQL server and Apache/WordPress are installed on the same host, we need to use “localhost” rather than “centos3” for the hostname.
Not sure of the implications of this/best practices, but I just added
$_SERVER['HTTPS'] = 'on';
to my index.php.
Reason for this is that I am running a php app behind a reverse proxy, with the connection between the app server and the reverse proxy being plain HTTP, but the connection between the client and the reverse proxy is HTTPS.